Augmented Reality Sandbox DIY
Here you will find all the information required to set up your own custom sandbox.
![]()
Check our latest project – complete DIY augmented reality sandbox project:
- Parts list
- Drawings
- Assembly instructions
- Pre configured software
Hardware Requirements
To run our software on you will need:
Minimal setup (FULL HD):
Recommended setup:
Sensor:
Kinect 2 PC, Kinect X-BOX ONE with PC Adapter

Projector picks for the by ar-sandbox.eu team UPDATE 11.10.2023
| Throw ratio | Image Offset | Brightness | Resolution | Lamp | LCD/DLP | Price est. | |
| Acer P5535 | 1.13 – 1.47 | 132% | 4500 | 1920×1080 px | 4000h | DLP | €796,40 |
| NEC ME403U | 1.2 – 2 | ca 115 | 4000 | 1920×1200 px | 10000h | 3LCD | €960,45 |
| ViewSonic X2 | 0.69, 0.83 | 105 | 3100 | 1920×1080 px | 30000h LED | DLP | €1 130,79 |
| Epson EB-1795F | 1.04, 1.26 | 3200 | 1920×1080 px | 4000h | LCD | €1 211,24 | |
| Optoma ZH420 | 1.12, 1.47 | 116% | 4300 | 1920×1080 px | 30000h Laser | DLP | €1 449,21 |
| Epson CO-FH01 | 1.19, 1.6 | ca 100% | 3000 | 1920×1080 px | 6000h | LCD | €482,92 |
| Panasonic PT-VMZ51 | 1.09, 1.77 | lens shift | 5200 | 1920×1200 px | 20000 Laser | LCD | €2 334,83 |
| Panasonic PT-VMZ61 | 1.09, 1.77 | lens shift | 6200 | 1920×1200 px | 20000 Laser | LCD | €3 143,82 |
| Panasonic PT-VMZ71 | 1.09, 1.77 | lens shift | 7000 | 1920×1200 px | 20000 Laser | LCD | €5 022,25 |
| Viewsonic PX706HD | 0.69, 0.83 | 105% | 3000 | 1920×1080 px | 4000h | DLP | €818,43 |
| Panasonic PT-VZ580 | 1.1, 1.77 | lens shift | 5000 | 1920×1200 px | 7000h | LCD | €1 301,12 |
| NEC P554U | 1.2, 2 | lens shift | 5300 | 1920×1200 px | 4000h | LCD | €1 280,67 |
| Optoma HD29HLVx | 1.12, 1.47 | 116% | 4500 | 1920×1080 px | 6000h | DLP | €822,25 |
| Benq MH733 | 1.15~1.5 | 115% | 4000 | 1920×1080 px | 4000h | DLP | €898,43 |
Hardware setup
How to correctly place both Kinect sensor and the projector.

Sensor and projector placement without (left) and with (right) lens shift.
There are two things you'll have to bear in mind: the Augmented Reality Sandbox Software works best when the sensor is close to the light beam source and at the same time, it [sensor] should be placed approximately above the center of the sandpit. To meet both of these requirements we suggest using a lens shift projector. It may be slightly costlier, but will provide great quality of simulation and minimize errors.
Having the projector and Kinect far apart may result in parallel shifts in the projection. Those are usually not significant, but visible. We found that the best way to avoid this issue is to mount a lens shift projector close to the kinect and place them above the center of the sandpit. Such solution is only possible with this certain type of projector.

Remember that the Kinect sensor should be placed exactly above the center of the sandpit, facing downwards. See the overhead view image for clarification.
Example setup

Software requirements
Drivers and packages necessary to run KinectSandbox and modules
Operating system:
KinectSandbox
Kinect for Windows SDK 2.0
FBX Export
Quick Setup
Before you go to next steps check if software is working. Start software with given calibration. You will make your own later.press TAB
1. Set the Sandbox Bottom Level
2. Set Terrain Bottom Level
3. Set Borders
Software Calibration
Step by step tutorial.

1. Prepare the surroundings
For best results the application requires scrupulous calibration. The outcome of the process depends heavily on surrounding conditions, especially the lighting. It should be constant, evenly distributed and very slightly dimmed, soft daylight-like.
Make sure there are no flashing lights nearby, such as TV screens, or faulty light bulbs. Also cover the windows in case weather conditions (clouds, etc.) could affect lighting in the room.
The areas right next to the sandbox have to be nonreflective – avoid things such as oil-painted walls or tile floors. If necessary, cover them with white paper sheets.

2. Set up calibration boxes
To correctly gather calibration data, sensor needs smooth, flat and preferably white surfaces.
Our suggestion is to use cardboard boxes of three different sizes listed below. They should be arranged so that the edges of the same length contact each other and only the height varies. It’s best to not leave any gaps between boxes, however if they occur (eg. because of size of the sandpit), fill them with white paper sheets, so that the lowest surface is also plain white. Also, keep in mind that the boxes should cover all the space lit by your projector and ideally even stick out a bit.
Box 1 – 20x20x20cm
Box 2 – 20x20x15cm
Box 3 – 20x20x10cm
Use this scheme to set up the boxes, starting from the edge of the sandpit:


Boxes in sandpit 100cm x 60cm


3. Run the calibration software
During the calibration process you should be able to see a changing pattern, looking like the one on the right. Make sure it is on top of the projection and no other window is displayed above it.
Before running the calibration check if your display’s resolution matches that of your projector.
Windows 11
When using Windows 11 operating system you need to run ProjectorServer server in “compatibility mode”
Right click on the AR_Sandbox_Calibration\ProjectorServer.exe
Windows 8″ and check boxes: “Run us administrator” and “use legacy display ICC color management’

Calibration automatic mode:
- Backup the existing calibration file (D:\ar-sandbox.eu KinectSandbox…\KinectSandbox_Data\StreamingAssets\calib.xml) to your chosen location outside D:\ar-sandbox.eu KinectSandbox… folder; if the calibration software doesn’t work as intended, you can always restore the original file,
- Go to “Calibration_ar-sandbox.eu” folder,
- Run “autocalibration – start programs.exe” app as administrator,
- Wait about 30 seconds until you see a ‘Programs ready‘ notification,
- Run “autocalibration – calibration.exe” app as administrator,
- Wait about 2-3 minutes, until you see a ‘Calibration saved‘ notification,
- Copy the calib.xml file to D:\ar-sandbox.eu KinectSandbox…\KinectSandbox_Data\StreamingAssets\calib.xml (replace)
- Run AR-Sandbox app to determine whether the calibration process worked; keep in mind the AR-Sandbox app is designed to work with sand and it may glitch at sharp edges. If you are unsure about the result, try removing the boxes and applying sand instead. Also, slight projection shifts towards outer edges of the sandpit are possible and are a natural thing.
Calibration manual mode:
- Backup the existing calibration file (D:\ar-sandbox.eu KinectSandbox…\KinectSandbox_Data\StreamingAssets\calib.xml) to your chosen location outside D:\ar-sandbox.eu KinectSandbox… folder; if the calibration software doesn’t work as intended, you can always restore the original file,
- Go to D:\Calibration_ar-sandbox.eu\AR_Sandbox_Calibration folder,
- Run KinectServer app as administrator,
- Run ProjectorServer app as administrator,
- Run CalibrateEnsemble app as administrator,
- In CalibrateEnsemble open the calibration file (menu File > Open… > D:\Calibration_ar-sandbox.eu\calib.xml),
- Run calibration (menu Calibrate > Acquire) and wait until you see ‘Acquire complete’ message at the bottom of log window on the right side of the app window; you may need to left-click with your cursor outside the app window, as the Acquire screen will by default run in the background; this step should take approximately 1 minute, and you should be able to see changing vertical and horizontal pattern across the screen, implying the program is running correctly,
- Solve calibration (menu Calibrate > Solve) and wait until you see ‘Solve complete’ message at the bottom of log window on the right side of the app window,
- Save calibrated file (menu File > Save),
- Copy the calib.xml file to D:\ar-sandbox.eu KinectSandbox…\KinectSandbox_Data\StreamingAssets\calib.xml (replace),
- Run AR-Sandbox app to determine whether the calibration process worked; keep in mind the AR-Sandbox app is designed to work with sand and it may glitch at sharp edges. If you are unsure about the result, try removing the boxes and applying sand instead. Also, slight projection shifts towards outer edges of the sandpit are possible and are a natural thing.
- In case the original calib.xml file doesn’t exist or the results of calibration are very poor: in CalibrateEnsemble create new file (menu File > New, make sure Number of Projectors and Number of Cameras is 1) and save it to D:\Calibration_ar-sandbox.eu\
Troubleshooting
It may happen that the calibration process doesn’t immediately give perfect results. This is mainly because it uses and depends on physical objects and can be affected by their imperfections. Usually it’s a matter of few simple steps to reach the wanted level of accuracy.
- The most common problem is projection being shifted compared to the actual shape of the sand. Reason behind this is the program misinterpreting or having wrong input data. First thing to do in such situation is to re-run the calibration software. If it doesn’t help, you should try repeating the actions described in the first paragraph. As the lighting plays crucial role in the process, try changing it. Firstly, lower the projector’s brightness. Then, if necessary, brighten up the room. Avoid direct light sources and letting sunlight in.
- Shift in the projection may also be a software issue. Check if resolutions match: projector’s resolution, Windows display, KinectSandbox resolution (you can find and edit it here D:\ar-sandbox.eu KinectSandbox…\KinectSandbox_Data\StreamingAssets\GlobalSettings) and finally the resolution described in the calib.xml file (find and edit lines <height>1080</height> and<width>1920</width>). Re-run the calibration.
- If you encounter glitches in the KinectSandbox app, it doesn’t necessarily mean there is a problem with the calibration itself. Check the most important settings inside the app: borders and levels. You will find detailed instructions below.
- Another problem that can occur is the projection going completely dark after launching the KinectSandbox app with a new calib.xml file (sometimes it is just a matter of tweaking levels settings -decrease the ‘Terrain Bottom Level’ until you start seeing a picture). In such case go to D:\Calibration_ar-sandbox.eu\AR_Sandbox_Calibration, run the CalibrateEnsemble program as administrator, open the calib.xml file (menu File > Open…) from D:\ar-sandbox.eu KinectSandbox…\KinectSandbox_Data\StreamingAssets and check the number assigned to the display (menu Setup > Show Projector Server Connect Displays). You will see a number on the screen (should be either 0 or 1). Remember this number and then manually edit the calib.xml file (Open with Notepad). Find the line: <displayIndex>…</displayIndex> and write the display number in place of the dots.
- If the projected image looks nothing like the objects in your sandbox, check the number of lines in the newly prepared calib.xml file. It should be precisely 187. If it is not, it means the calibration process malfunctioned and has to be repeated. It can either be a matter of physical input (too high brightness, obstacles), or a software problem. Pay close attention to all the steps. Restore the default calibration folder and re- run the calibration.
- One last issue you can encounter is the calibration programs windows closing by itselves right after being started. This can happen, when another program, e.g. an antivirus software is blocking a TCP port. In such case, run task manager and end all tasks, then restart the calibration software.
Should you still have problems with your calibration, keep the old and new calib files and contact us at service@ar-sandbox.eu
Operating manual
Quick overview of the most important settings inside the application.
In this chapter you will find a simplified description of the software’s most important settings. They are pretty important to acknowledge before you start using your device. Press ‘Tab’ to open Settings Menu inside the application.
A detailed, full-lenght specification can be found here.
Note: to save setting changes made inside the app press Alt + F4 (exit).

Distance from the sensor
Perhaps the most crucial parameters are 'Sandbox Top' and 'Bottom Level'. They specify the physical range of the Kinect sensor. See image for more details. Values of both levels are the distances in mm. The best way to achieve good results is to tape-measure and input the resulting numbers. We recommend that the values you enter have a margin of about 50-100 mm in both directions.In the picture you can also see a parameter called 'WaterDropOffset'. It is the distance [mm] above 'SandboxTopLevel' required to activate waterflow. The higher the value, the higher you will have to lift your arm to make it rain. To directly control basic water options use computer keyboard or mouse. Press space or middle-click mouse to reset water - it will sink into the ground. To disable waterflow press 'b' or right-click mouse. The same goes for enabling water flow again.

Setting borders
Another essential settings are the 'Borders'. Because Kinect has a 90º field of wiev, the area it sees is much larger than any sandpit and needs to be restricted. In the picture you can see an example of how the borders can turn out with default values. Kinect sees the whole sandpit, but also some of the surrounding area. It may happen that there is an obstacle in that region, e.g. a reflective wall. Restrict Kinect's field of view by setting your borders along the arrows to the point when they become visible in your sandpit. This will also ensure that no light escapes the box and your device looks much more professional.

Projection range
Two last parameters you will need to adjust are 'TerrainTop & BottomLevel'. They control the projected level of terrain in your sandbox. (unlike 'SandboxTop/BottomLevel' which described physical values) If you set the two values close to each other, distances between neighboring isohypses will shrink. If you want to build high mountains and deep valleys, set the two values farther apart. Important thing to acknowledge: 'TerrainBottomLevel' value has to be lower than 'TerrainTopLevel' – the number is higher, since the values are negative. Note: pretty common mistake is to blame malfunctioned calibration for the projection being completely dark/white, when actually it is a matter of setting the 'TerrainLevels' right. If your 'SandboxBottomLevel' exceeds 1200, you will probably need to decrease 'TerrainBottomLevel' a bit to be able to see colours.
Button controller is used to switch the water simulation on and off, or reset it. With many people around the sandbox it is easy to flood the area. To avoid it, switch the water off and then back on after you are finished building. The water that is already flowing won’t disappear, until you reset it.
The button uses keyboard/mouse controls to interact with the application – space/middle-click is water reset and ‘b’/right-click is water on/off. You will need a control board that emulates a computer keyboard (e.g. Arduino Leonardo). It will write space when the button is pushed and ‘b’ when held. You can download the script here (you will also need software to upload it onto the board) and connection scheme here. Another way is to use a standard computer mouse, but replace its original buttons with external ones.
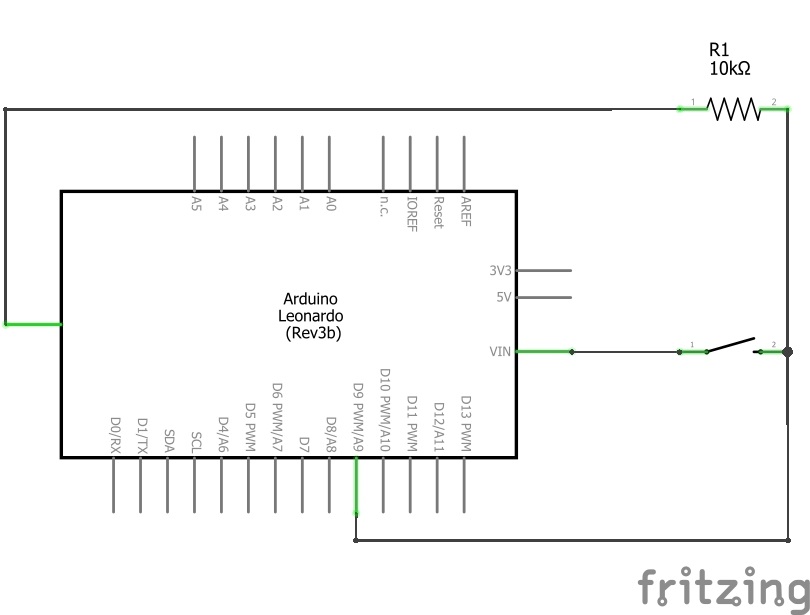
You can choose any button you want, as long as it is a normally open, monostable one. Mount it to your sandbox in a well-exposed place. To avoid it getting stuck with sand, choose a place above the sandpit level.
Below you will find a video tutorial with step-by-step instructions.

Touchscreen module
Additional feature for expanded functionality

Screen setup
As the touchscreen module is now available as a software extension, you can easily implement it in your custom Sandbox. This allows for quick control over the application via easy to use interface. Read more about touchscreen’s features and functionality here.
Now with the latest build of our KinectSandbox software you no longer have to match the resolutions of touchscreen and projector. The GUI will be automatically scaled to the size of the screen.
When setting up both screens in Windows, make sure they are next to each other (horizontally, not vertically). The projector should be the main display and touchscreen the secondary one.

Wireless control
Instead of a standard touchscreen you can use a tablet, your mobile phone or any other device capable of connecting to a wi-fi network. First set up the connection. You can either connect both devices to the same wireless network or, in case you want a faster and more reliable connection, use an additional router you will connect to your PC and use as a hub.
Next step is installing a screen-casting software on both devices. We use and recommend this app. After the installation open spacedesk on your mobile device and connect with the PC. If you have the KinectSandbox software running, it will restart automatically. You may need to configure Windows display settings. Make sure the projector is the main screen and the setup is ready to go.
Below you will find a video tutorial with step by step istructions.
Automatic startup/shutdown
Bring automation to your project
Automatic startup is a standard feature in almost all of our products. With a single push of a button the device powers up and starts the application. Same goes for shutdown.
You can automate your own sandbox under two conditions. First one is that your projector has a RS-232 port. Second is that you buy a license for the KinectSandbox app. You will then receive a software package with all required scripts and an instruction on how to install them.
For now, let’s focus on the hardware part. You will need:
- USB to RS-232 serial adapter cable with both male connectors
- Null modem type RS-232 cable with two 9-pin female connectors
From this point the procedure is very simple. Connect the projector to your computer and install all scripts as instructed. One thing that may actually cause problems is the cables. Never go for the cheapest ones and reduce their length if possible. Buy the adapter cable that uses PL2303 chipset if you manage to find one. For some adapters you will need to install additional drivers. Check in Windows’ device manager if you are missing any.

Alternatively you can use a null modem double female adapter to connect the USB – RS-232 cable to your projector. Decreasing the total length of wires can contribute to reliability of your system. However, remember it is never good to stretch the cables. If you are running out of length, just use a null modem cable as described above. Again, don’t buy the cheapest adapter you can find or the result can be counterproductive.

FAQ
Your questions
Do you mean by “Kinect PC, Kinect X-BOX with PC Adapter” that both a Kinect for windows (version 1 or version 2.0?) as well as an Kinect for XBOX (1414/1473 or do you mean XBOX one?) with the (expensive J) adapter work? And do you know a webshop where we can still buy one of them (since they are no longer produced if I am correct)?
You will need Kinect 2 PC (it is Xbox ONE + PC adapter) You can buy refurbished one from the eBay.
Would the system also work with an intel Realsense camera (easier to find)?
Our system doesn't work with realsense. It is much much worse depth detector than Kinect 2. With Kinect 2 we get very accurate 3d model. We wish to use Azure Kinect in future.
Is there a way to incorporate the basic buttons you also provide with your systems if we build the system ourselves?
We are going to release full video tutorial, as well as we want to update existing one. Operating buttons is very simple. You can use mouse or wireless mouse to be interface. Just get wires out form mouse buttons and connect your button. We also provide Arduino code for Arduino Leonardo/Micro pro control.
Do you expect that we have to recalibrate if transport the system a lot?
If you will make rigid frame for kinect + projector it will be stable. We have unit with wheels and tower that automatically goes up and there is no need to re-calibrate when moving unit. Calibration is very simple by the way - you need just white boxes.
Do you have a discount for non-profit organizations, or is the price the same for companies and educational organizations?
Contact us, write about your project and let us think. At this moment price is very competitive.
How do you count the “visitors a month”?
We don't 🙂 We only estimate basing on our experience. We wanted to have affordable price even for small organizations but if there is a science center with thousands of visitors a day they have to pay. It's just about being fair.